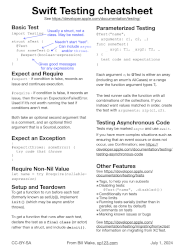
Apple has introduced a new unit testing framework. It has a simpler syntax, much simpler assertions, parameterized testing, and more. Let’s take a look. You can find a bonus cheatsheet at the end of this article.
Easier Syntax
XCTest (the old framework) used syntax similar to (and slightly worse than) JUnit 3. Every test class (and it had to be a class) needed to extend XCTest; test method names had to start “test”, and you had explicit setup and teardown methods.
The Swift Testing approach looks something like this:
import Testing

struct AMonthYear {
  @Test
  func advances_by_months() {
    #expect(2022.dec.advanced(by: 1) == 2023.jan)
    #expect(2000.jan.advanced(by: -1) == 1999.dec)
  }

  @Test
  func advances_by_years() {
    #expect(1960.jan.advanced(byYears: 10) == 1970.jan)
    #expect(1970.dec.advanced(byYears: -10) == 1960.dec)
  }
}
You typically use a struct rather than a class, though a class is permitted. Each test method is marked with an @Test attribute. This attribute can optionally attach a human-readable name e.g., @Test("adds up its values"). You can optionally use @Suite on the struct to give it a name or mark other attributes. Tests may be nested.
Tests run in parallel by default. The test runner creates a separate instance to run each test method, so you can get the effect of setup() with initial values and/or an initializer. If you want the effect of teardown(), you must use a class instead of a struct, and have a deinitializer deinit{}.
The test bodies are simple methods, but the assertions have changed.
Assertions
XCTest had more than a dozen different assertion methods, named in a similar pattern: XCTAssertEqual, XCTAssertGreater, XCTAssertNotNull, etc.
The new framework’s assertions really shine. There are only two basic functions:
#expect(expr) – covers all the assert cases – records a failure and keeps going.#require(expr) – similar to a precondition – if its constraints aren’t met, an error is thrown as there’s no point continuing the test. If the expression is boolean, it verifies it’s true. If it’s optional, it verifies that it’s non-nil.
JUnit’s assertEqual() addressed the desire to understand what went wrong. Something like:
assert(list.count == 2)
has a problem when it fails – we only know that it failed, but not the actual value. By contrast,
assertEqual(list.count, 2)
can tell us something like “actual value 7 doesn’t equal expected value 2”.
In Swift Testing,
#expect(list.count == 2)
tells us <<Expectation failed: (list.count → 7) == 2>>.
This “magic” builds on a relatively new feature in Swift: syntax-aware macros. #expect has access to the expression tree, so it can rewire it to capture both sides of the expression separately, and include both the text and the value in its message.
(C has had a “stringify” capability in its macros for many years, very commonly used in test frameworks, but many other languages don’t have a way to capture their source at compile time. And many languages don’t have a way to work around the need for assertEqual.)
Testing Exceptions
A test function can have throws in its signature, and any thrown exception is caught and reported as an error.
But sometimes, a test succeeds only if an exception is thrown. There’s a variant of #expect for that:
#expect(throws: someError) {
    ...
    try code that should throw
}
This test fails if the expected exception is not thrown.
Parameterized Tests
In some cases, code is very similar except for the particular data it uses. XCTests does not support parameterized testing. (In fact, I made an open-source package EgTest for just that purpose.)
In the new framework, @Test can take a list of arguments, each of which is a sequence (e.g., a list). You give your test function arguments that match their types.
The test runner generates combinations: the cross-product of the lists. For example [“a”, “b”, “c”] ✖️1..4 creates test for each of (“a”, 1), (“a”, 2″), … (“c”, “4”), 12 cases in all.
If you’d rather just have the first each element of each list, then the second, etc., use zip:
zip(["a", "b", "c"], 1...4)
This yields three cases: (“a”, 1), (“b”, 2), and (“c”, 3). Zip ignores extra elements past the length of the shortest sequence.
Other Capabilities
Finally, we’ll give a quick mention of a few other features.
Swift Testing lets you mark tests with tags, and then restrict a test run to various combinations. Or, you can mark a test as related to a particular defect. You can disable a test. You can also limit tests to a particular operating system or version.
To test asynchronous code: In the simplest case, you can declare a test function is async, and have the test use await. The library has “confirmations” to handle more complex situations.
Conclusion
Swift Testing is a definite improvement over XCTest. I’m most excited about the simplified assertions and parameterized tests – both will help make tests simpler and more readable.
BONUS: Swift Testing cheatsheet
References and Further Reading
“apple/swift-testing”, GitHub, https://github.com/apple/swift-testing. Retrieved 2024-06-20.
“Parameterized Unit Testing“, by Bill Wake. https://xp123.com/parameterized-unit-testing/. Retrieved 2024-07-05.
Swift Testing cheatsheet, by Bill Wake. Retrieved 2024-07-04.
“Swift Testing”, https://developer.apple.com/documentation/testing/ . Retrieved 2024-08-09
