I’ve been broadcasting on Twitch (https://twitch.tv/williamwake) for about 6 months. It took a little doing to understand what I needed to set up, so I thought I’d pay it forward and share what I did with others. At the end, I’ll post some resources I consulted.
This is all based on my experience, and works for me, but you’ll have to decide what fits your needs. I’d welcome your ideas – I’m still learning!
Some (marked) links are affiliate links – you help support the site if you follow one of these links and buy something.
Table of Contents (toc)
- Physical Setup – laptop, mike, & desk
- Physical Add-Ons – extras for better presentation
- Software
- OBS Studio Details
- Checklists
- Scripts
- Resources – other articles on setting up for video
Physical Setup (^toc)
These are things I already had when I started.
Computer: MacBook Pro with a second monitor, tablet (occasionally). I use an adjustable-height desk with a side table for the monitor. (I usually stand while presenting.)
Samson Q2U Mike: ($70) I chose this based on a review by Pat Flynn
Neewer mike stand: ($15) Clamps to edge of table. I’ve found I can keep the mike down pretty low, just in view.
Knox Microphone Shock Mount: ($20) Keeps the mike from picking up bumps & shakes.
Physical Add-Ons (^toc)
I added a few things once I got going for a bit.

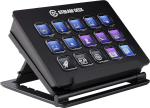
Elgato Stream Deck: ($150) This is a 15-button controller. You can make buttons trigger OBS scene changes, or open applications. I got it because I was self-conscious about changing scenes, especially at the end of a show. Instead of fumbling around on a second screen, now I can continue talking to the camera and hit the right button by feel. I probably should have gone with the 6-button version (as I use the corners by far the most), but I congratulate myself that I didn’t go for the 32-button version:)
Green screen backdrop: ($50) If my walls were a higher-contrast color, I might have resisted this (longer:), but they’re beige and I was washed out. This one is a 5’x7′ oval, a popup like you might have for a car shade. (I’ve never tried to put it back in its bag.) I mounted it sideways on a tripod (with a $2 clamp).
Light stand tripod: ($30) I have this stretched to the max, and sitting on a box, putting the top of the green screen about 2″ from the ceiling. If I’m careful with the laptop camera, you don’t see any “corners”.
The most surprising thing to me was that this all works so well without any special lighting. Even with just an overhead light, I don’t get green or other artifacts showing up.
Software (^toc)
OBS Studio – This is the main software I use to interface with Twitch. I originally found its setup a bit confusing. It took me too long to realize that a “Scene” is a combination of input sources such as mike, camera, and screen, and that you use different ones for different camera angles or situations. See below for details of how I use it.
SwitchResX – MacOS used to give you a lot more control over the screen resolution; now I use SwitchResX to force my screens to 1920×1080.

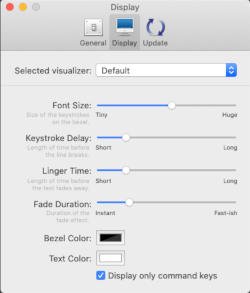
KeyCastr – This displays a representation of the key combinations you type. I try to use the IDE’s key combos and narrate what I’m doing. Here is my settings screen:
Catlight with Jenkins – I have Jenkins in a separate account, polling the source repository every few minutes, and running when it changes. (The iOS app I’m developing has user interface tests that take about a minute to run, and I run it several times under different emulators.) Catlight puts a widget in the menu bar that’s yellow while Jenkins runs, red when it fails, and green when it passes.
LetsView – This app lets me mirror my tablet or phone to my Mac. It’s a touch awkward – you have to start apps on both sides, and re-connect if anything goes to sleep.
Virtual Camera – This is a plugin for OBS that lets it provide a feed from OBS to Zoom.
Zoom – Zoom seems to keep changing its mind about supporting virtual cameras or not. Last I tried, it seemed to support the camera but not the mike. To use OBS as a source, start OBS, then trigger “Start Virtual Camera” on the Tools menu. In Zoom, select “OBS Virtual Camera” as a source; you should be able to select scenes.
OBS Studio Details (^toc)
 Offline |  Starting Soon |  Main |
 Tablet |  Break Time |  Talking Head |
 Secret |
Here are my scenes:
- Offline – A page that shows how to reach me, and tells my planned schedule.
- Starting Soon – Plays some background music and displays “User Stories.jpg” from a particular folder.
- Main – This has my mike and the screen, is overlaid with a picture of me in the corner. It also has a chyron that automatically shows the currently active task at the bottom of the screen; see scripts below. (The red outline is in the preview, not the broadcast.)
- Tablet – Shows the LetsView app which mirrors my tablet’s display. I haven’t used this as much as I expected.
- Break Time – A “crowd noise” recording and a picture that says we’re taking a 5-minute break.
- Talking Head – Camera + mike. I don’t know if I’ve ever used it for Twitch, though I have for Zoom. I could put a background picture in OBS, or let Zoom do it.
- Secret – Displays a picture that says “Top Secret”; I use it if I have to enter a password or anything private.
Here are my settings (at least the ones of any possible interest:) I’ve adjusted these a bit from the defaults.
- Stream – you have to link it to your Twitch account.
- Output: Encoder = x264; Rate Control = CBR; Bitrate = 2500 Kbps; CPU usage = veryfast
- Audio: SampleRate = 44.1Khz; Channels = Stereo
- Video: Base (Canvas) Resolution = 1920×1080; Output (Scaled) Resolution = 1920×1080; Common FPS values: 30. (I saw somewhere that 1920×1080 is the preferred Twitch canvas size; I reduced to 30 fps to lower load on my machine.)
Checklists (^toc)
I have these on paper, and check through them as I get going. I’m at my desk 15 to 30 minutes before the start time.
Gotcha: “Check that camera shot in the corner is the right size” – this addresses a bug in OBS – it forgets the size of the inset image. I want 320×240, but it sometimes forgets this & puts black edges around. If I set it to 640×480, then back to 320×240, it works (till next time).
| 15 Minutes Before * Make sure monitor is in 1920×1080 (1080p) in SwitchResX * Option-click notifications (upper right corner) to turn on “do not disturb” * Mute your phone * Minimize/close sensitive windows * Plug in mike and turn it on * Make sure Stream Deck is plugged in * OBS + Start OBS + Go to Main and check that right mike is registering, green screen covers camera field, and the camera shot in the corner is the right size. + Select Offline scene + Start Streaming + Select Starting Soon scene + Verify that audio is coming through on Twitch page, then turn it off * Post “We’ll start in about 15 minutes” on twitch.tv chat * Post “Join me in 15 minutes” on Twitter * Open new terminal window and run: > HISTSIZE=0; HISTSIZE=500; ~/twitch-start.sh * Check apps: + Jenkins (“brew services start jenkins-lts” on jenkins account) + Catlight (should be green) + Keycastr (keystrokes on) + Start Xcode + Arrange windows (put Xcode far left) + Run the app (to get things built and cached) + Open Keynote on episode page, in presentation mode |
| At the Start Time * Welcome people in chat * OBS: Select Main screen * Smile! * Welcome people verbally * Start Pomodoro timer |
| At end * Say goodbye (verbal & chat) * Smile * Switch to Offline in OBS * Stop streaming (after a couple minutes) * Optionally stop Jenkins (“brew services stop jenkins-lts” in jenkins account) * In Terminal: > ~/twitch-stop.sh * Go to Twitch page “Video Producer” and edit episode title |
Scripts (^toc)
I have a couple scripts (mentioned above) that I run before and after the show. I’m pretty sure I had to install watchman myself. (It calls a script when a file changes.) In this case, I actively keep a “_todo.txt” file up to date as I work. Whenever I save it, the script copies it to an OBS folder, where the chyron reads it and adds it to the screen.
~/twitch-start.sh#!/bin/bash~/desktop-hide.sh |
header.sh#!/bin/shhead -1 _todo.txt >~/Desktop/Twitch/_OBS/_todo_head.txt |
~/twitch-stop.sh |
Desktop show and hide manage all the file icons on your desk.
~/desktop-show.sh |
~/desktop-hide.sh |
Resources (^toc)
“Live Coding on Twitch“, by Ted M. Young
“My Twitch Live Coding Setup“, by Suz Hinton
“My Live Streaming Equipment and Setup“, by Pat Flynn
Conclusion
I hope this has been helpful. Feel free to contact me if you have any questions or suggestions.
![Samson Q2U [Amazon affiliate link]](https://xp123.com/wp-content/uploads/2020/09/mike-1.png)
![Neewer mike stand [Amazon affiliate link]](https://xp123.com/wp-content/uploads/2020/09/boom.png)
![Knox mike shock mount [Amazon affiliate link]](https://xp123.com/wp-content/uploads/2020/09/mount-1.png)
![Green screen backdrop [Amazon affiliate link]](https://xp123.com/wp-content/uploads/2020/09/green-screen.png)
![Light stand tripod [Amazon affiliate link]](https://xp123.com/wp-content/uploads/2020/09/tripod.png)